ShopDreamUp AI ArtDreamUp
Deviation Actions


![[Patatober] Dizzy](https://images-wixmp-ed30a86b8c4ca887773594c2.wixmp.com/f/a52d7d64-1160-4716-bfa6-51fc8ac5a4a4/dethzmw-9d599eeb-0fa9-40e1-a538-598a11a71673.png/v1/crop/w_184,h_184,x_36,y_0,scl_0.25555555555556,q_70,strp/_patatober__dizzy_by_akitchu_dethzmw-92s-2x.jpg?token=eyJ0eXAiOiJKV1QiLCJhbGciOiJIUzI1NiJ9.eyJzdWIiOiJ1cm46YXBwOjdlMGQxODg5ODIyNjQzNzNhNWYwZDQxNWVhMGQyNmUwIiwiaXNzIjoidXJuOmFwcDo3ZTBkMTg4OTgyMjY0MzczYTVmMGQ0MTVlYTBkMjZlMCIsIm9iaiI6W1t7ImhlaWdodCI6Ijw9NzIwIiwicGF0aCI6IlwvZlwvYTUyZDdkNjQtMTE2MC00NzE2LWJmYTYtNTFmYzhhYzVhNGE0XC9kZXRoem13LTlkNTk5ZWViLTBmYTktNDBlMS1hNTM4LTU5OGExMWE3MTY3My5wbmciLCJ3aWR0aCI6Ijw9MTI4MCJ9XV0sImF1ZCI6WyJ1cm46c2VydmljZTppbWFnZS5vcGVyYXRpb25zIl19.R399Twebg6Fsl16ocJA3pthFadOHziP0oxyZRP8YiAg)
![[Patatober] Dizzy](https://images-wixmp-ed30a86b8c4ca887773594c2.wixmp.com/f/a52d7d64-1160-4716-bfa6-51fc8ac5a4a4/dethzmw-9d599eeb-0fa9-40e1-a538-598a11a71673.png/v1/crop/w_92,h_92,x_18,y_0,scl_0.12777777777778,q_70,strp/_patatober__dizzy_by_akitchu_dethzmw-92s.jpg?token=eyJ0eXAiOiJKV1QiLCJhbGciOiJIUzI1NiJ9.eyJzdWIiOiJ1cm46YXBwOjdlMGQxODg5ODIyNjQzNzNhNWYwZDQxNWVhMGQyNmUwIiwiaXNzIjoidXJuOmFwcDo3ZTBkMTg4OTgyMjY0MzczYTVmMGQ0MTVlYTBkMjZlMCIsIm9iaiI6W1t7ImhlaWdodCI6Ijw9NzIwIiwicGF0aCI6IlwvZlwvYTUyZDdkNjQtMTE2MC00NzE2LWJmYTYtNTFmYzhhYzVhNGE0XC9kZXRoem13LTlkNTk5ZWViLTBmYTktNDBlMS1hNTM4LTU5OGExMWE3MTY3My5wbmciLCJ3aWR0aCI6Ijw9MTI4MCJ9XV0sImF1ZCI6WyJ1cm46c2VydmljZTppbWFnZS5vcGVyYXRpb25zIl19.R399Twebg6Fsl16ocJA3pthFadOHziP0oxyZRP8YiAg)


Description
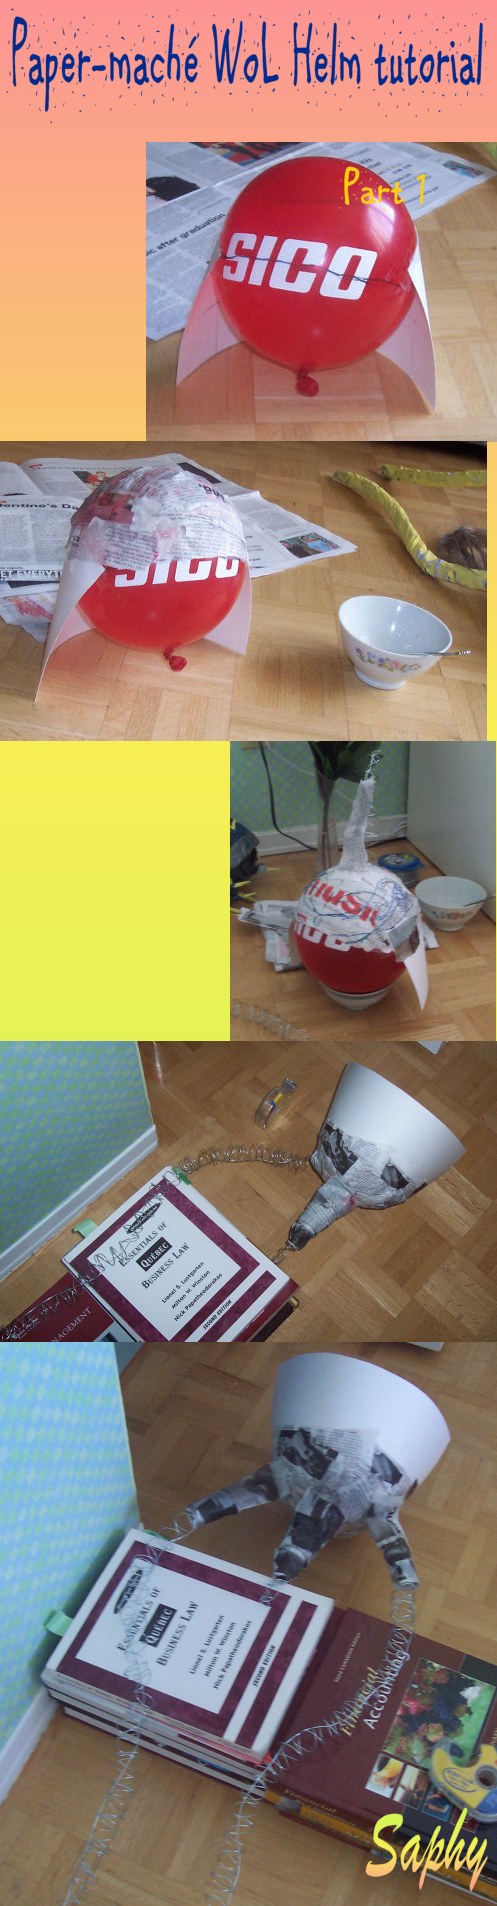
Part 2 can be found here: [link]
Party 3 can be found here: [link]
I guess I wouldn't mind sharing how to make WoL's helmet with everyone here, the steps are simple enough The best part is that this is economically (and maybe environmentally!) friendly! Actually following the steps is a completely different story.
Updated the tutorial to look somewhat prettier and more consistent with the previous tutorial")
Pre-requisites:
Basic knowledge of paper-maché
Lots of time
Lots of patience
Materials used:
Newspaper (1 section of about 20 pages should be enough)
Homemade glue (STRONGLY recommended, as you will be using a LOT of them! Glue can be made by mixing hot/boiling water and flour together. I used glutenous rice flour and cooked it in a pot for a more sticky consistency.)
Galvanized (craft works too) wires (I think I used about 3 metres of wire, but it depends how tall you want your horns)
Old piece of wig or anything that looks like one, preferably gray
Piece of scrap cardboard
Tape
Balloon!
All of the supplies can be found at a dollar store or for free! Very economically friendly!
***NOTE***: I didn't cover how to create the wire base for the horns. I'm sorry! >.<; All I can tell you is take your wires, wrap it around a thin pole (or broomstick) and then shape it from there. As for the cone, roll a piece of paper into a cone and tape it together instead of making a wire base for it.
Step 1: I blew up the balloon about as big as my head. I used my old WoL helm as reference (it was actually too big for my puny head). I haven't completed the helm yet, so fingers are crossed that the helm isn't too small!
I also taped the cardboard to the balloon so that WoL's helm doesn't get a spherical shape.
Step 2: First layer of paper-maché! It was scary, because the tape holding the cardboard to the balloon wouldn't stick. This step took the longest for the paper to dry because only one side of the paper is being dried. Do not use a blow-dryer to speed up the process. I have tried this with my old helm and the balloon expanded. There's also a good chance that your balloon will burst, meaning you have to start over again (and you wasted time!)
Step 3: As you can see, I doodled markings on the helm after about 3 layers of paper-maché. They are indicators of where I put the wire base.
I taped down one of the wire bases onto the helm. Then I paper-maché the wire base down for increased strength. I let that dry before covering the wires with more paper.
IF you use the paper cone as base, just tape it down. You'll have a much easier time getting a smooth texture than using wires.
Step 4: Now for the scary part. Put your helm face down. Take one of your wire horns and tape it onto your helm. Then paper-maché it down (get the idea?) for increased strength. If you don't want your helm to roll, put it on a bowl. For the horns to remain straight up, put it on top of a stack of books. This way your horns won't tilt down while as you work with it.
I strongly recommend you do one horn at a time. This makes the entire helmet-making process less scary and less mistakes will be made.
After you paper-maché the horns down, you can start working on the horn. I strongly suggest you paper-maché at least half of the first horn before starting the other.
Step 5: I did something very risky here and I strongly recommend you do not do this if you're not careful. I put the second horn on after I paper-maché the first layer of the other horn. I was very, very careful throughout this delicate process, and even I still made a mistake (now one of the horns tilts slightly to the middle - I have OCD and the horns must be perfectly aligned).
tl;dr Don't start the second horn until the first horn is half-way covered with DRIED paper-maché.
And stick the hair-wig... thing into the cone. You can wrap the hair-wig thing in a plastic bag so that none of the strands get stuck. ^^
Part 2 is here!: [link]
I allow anyone to distribute the tutorial freely under these conditions:
1. Do not charge people money for use of this tutorial, whether the money goes to you, me, or anyone else
2. Link back to the tutorial or credit me!
Warrior of Light is ©Square-Enix
Party 3 can be found here: [link]
I guess I wouldn't mind sharing how to make WoL's helmet with everyone here, the steps are simple enough
Updated the tutorial to look somewhat prettier and more consistent with the previous tutorial
Pre-requisites:
Basic knowledge of paper-maché
Lots of time
Lots of patience
Materials used:
Newspaper (1 section of about 20 pages should be enough)
Homemade glue (STRONGLY recommended, as you will be using a LOT of them! Glue can be made by mixing hot/boiling water and flour together. I used glutenous rice flour and cooked it in a pot for a more sticky consistency.)
Galvanized (craft works too) wires (I think I used about 3 metres of wire, but it depends how tall you want your horns)
Old piece of wig or anything that looks like one, preferably gray
Piece of scrap cardboard
Tape
Balloon!
All of the supplies can be found at a dollar store or for free! Very economically friendly!
***NOTE***: I didn't cover how to create the wire base for the horns. I'm sorry! >.<; All I can tell you is take your wires, wrap it around a thin pole (or broomstick) and then shape it from there. As for the cone, roll a piece of paper into a cone and tape it together instead of making a wire base for it.
Step 1: I blew up the balloon about as big as my head. I used my old WoL helm as reference (it was actually too big for my puny head). I haven't completed the helm yet, so fingers are crossed that the helm isn't too small!
I also taped the cardboard to the balloon so that WoL's helm doesn't get a spherical shape.
Step 2: First layer of paper-maché! It was scary, because the tape holding the cardboard to the balloon wouldn't stick. This step took the longest for the paper to dry because only one side of the paper is being dried. Do not use a blow-dryer to speed up the process. I have tried this with my old helm and the balloon expanded. There's also a good chance that your balloon will burst, meaning you have to start over again (and you wasted time!)
Step 3: As you can see, I doodled markings on the helm after about 3 layers of paper-maché. They are indicators of where I put the wire base.
I taped down one of the wire bases onto the helm. Then I paper-maché the wire base down for increased strength. I let that dry before covering the wires with more paper.
IF you use the paper cone as base, just tape it down. You'll have a much easier time getting a smooth texture than using wires.
Step 4: Now for the scary part. Put your helm face down. Take one of your wire horns and tape it onto your helm. Then paper-maché it down (get the idea?) for increased strength. If you don't want your helm to roll, put it on a bowl. For the horns to remain straight up, put it on top of a stack of books. This way your horns won't tilt down while as you work with it.
I strongly recommend you do one horn at a time. This makes the entire helmet-making process less scary and less mistakes will be made.
After you paper-maché the horns down, you can start working on the horn. I strongly suggest you paper-maché at least half of the first horn before starting the other.
Step 5: I did something very risky here and I strongly recommend you do not do this if you're not careful. I put the second horn on after I paper-maché the first layer of the other horn. I was very, very careful throughout this delicate process, and even I still made a mistake (now one of the horns tilts slightly to the middle - I have OCD and the horns must be perfectly aligned).
tl;dr Don't start the second horn until the first horn is half-way covered with DRIED paper-maché.
And stick the hair-wig... thing into the cone. You can wrap the hair-wig thing in a plastic bag so that none of the strands get stuck. ^^
Part 2 is here!: [link]
I allow anyone to distribute the tutorial freely under these conditions:
1. Do not charge people money for use of this tutorial, whether the money goes to you, me, or anyone else
2. Link back to the tutorial or credit me!
Warrior of Light is ©Square-Enix
Image size
497x1906px 1.21 MB
Comments9
Join the community to add your comment. Already a deviant? Log In
Uwah~~! This is amazing! *__* I would never be able to do something like this. I have so little patience for armour. XDD Keep up the great work, Sapphy! I hope to see more of your epic cosplays!